October 07, 2011

Morgh-e Torsh - Sour Chicken Stew with Fresh Herbs and Yellow Split Peas


I've been wanting to make مرغ ترش (morgh-e torsh) for quite some time, but I've somehow never gotten around to it. Recently, I received a very kind email from a reader requesting this recipe, along with a couple of other dishes from the northern province of Gilan, which inspired me to write a post about it. 

This dish is a relatively easy dish to prepare, yet the flavor is truly exceptional; each bite is rich, vibrant, and satisfying. The cuisine of Shomal (northern Iran) has a distinctive character, shaped by its unique local herbs and vegetables that are hard to find anywhere else. 

Northern Iran is also known for its lush rice fields, scenic tea plantations, and caviar from the Caspian Sea  (Darya-ye Khazar). 


This morgh-e torsh recipe was given to me by a very dear friend. My wonderful friend Maryam is from Rasht and now lives in Toronto with her loving family. I met Maryam in college here in New York, and we instantly became friends. We spent so much time together, laughing, sharing stories, and occasionally complaining about homesickness. 

After graduation, she moved away. Although we've lost touch briefly from time to time, over the years we have remained lifelong friends. Thanks to Maryam, I'm able to share this amazing Gilani recipe with you.


I made a couple of minor adjustments to the recipe. Maryam's original recipe calls for one whole chicken, but I used about two pounds of boneless, skinless chicken breasts instead, cut into small pieces. The second change was the addition of turmeric. I simply couldn't resist adding a pinch of turmeric powder while sauteing the chicken. 


Sour Chicken Stew with Fresh Herbs and Yellow Split Peas
Morgh-e Torsh

Ingredients

Serves 4-6

-1 whole chicken, cut into pieces
-1/2 cup yellow split peas
-2 bunches of coriander, finely chopped
-1 bunch of parsley, finely chopped
-1 bunch of fresh mint, finely chopped
-1 large onion, peeled and diced
-4-5 garlic cloves, peeled and minced
-Juice of  1-2  narenj (Seville orange/bitter orange) or juice of 1-2 lemon/lime (adjust to taste)
Salt and pepper to taste
Water
Oil

Method:
  1. Wash and clean all the fresh vegetables, remove the stems, and chop them finely.
  2. In a skillet, heat 3 tablespoons of vegetable oil over medium heat. Sauté the chopped onion and minced garlic until fragrant. Add the chopped herbs and cook until soft and tender.
  3. Cook the yellow split peas in 2 cups of water with a dash of salt for about 30 minutes or until they become soft. Discard the water.
  4. Lightly fry the chicken pieces in a couple of tablespoons of oil in a frying pan on medium heat until they are no longer pink. Add salt and pepper to taste. As I mentioned, I added a pinch of turmeric at this stage.
  5. In a large saucepan, combine the sauteed herb mixture, cooked chicken, and yellow split peas. Add enough water to cover the ingredients. Bring to a boil over medium-high heat. Reduce the heat, season with salt and pepper, and add the juice of Seville orange or lemon/lime juice to your taste. Cover and simmer on medium-low heat for about 1 hour until all the flavors come together, stirring occasionally. Taste and adjust seasoning if needed.
Transfer the stew to a large serving bowl. Serve with kateh or polow, zeytoon parvardeh, and pickled garlic.
For a complete Gilani lunch or dinner, consider adding Mirza Ghasemi to the menu as a side dish.
 
Enjoy!

September 29, 2011

Sholeh Maash - Persian Green Mung Bean and Kohlrabi Hearty Soup


Ever since I saw the recipe for shole maash online in the 19th-century Qajar Women Cookbook, I have been thinking about giving it a try. شله ماش  Sholeh Maash (mung beans with kohlrabi) makes a tasty and nutritious autumn soup. This recipe, like the others in the book, consists of a brief description of what the necessary ingredients are, and the word yek-meghdar (some) is frequently used to describe the amount needed for each ingredient. Persian cuisine is forgiving in terms of measurements, and when you ask a grandmother for a recipe, the answer is basically a list of the ingredients with yek-kami (a little bit) of this and yek-meghdar (some) of that, and that's how I, along with many other Iranians, learned to cook. I learned that you can use a little less or a little more of most ingredients in a recipe, depending on your taste and preferences. A few months into blogging, I bought a food scale to measure the ingredients by weight, but I have rarely used it.


Sholeh maash is not a thin and watery soup. It's a rather rich soup that can be served as a main dish. The original recipe calls for meat, but I've decided that it is substantial enough without the addition of any lamb or beef.


Sholeh Maash - Persian Green Mung Bean and Kohlrabi Hearty Soup

Ingredients:
Serves 6

1 1/2  cups green mung beans, rinse 2-3 times
1/2 cup rice, rinse well
3-4 medium-sized kohlrabi, peel and cut into small cubes, leave one cubed kohlrabi for the topping
1 large bunch of fresh tareh or scallions (green parts only), washed and chopped
1 small bunch of fresh tarragon, stems removed and chopped
Water
Salt and pepper to taste
2 large onions, thinly sliced
2-3 garlic cloves, diced
1/3 teaspoon turmeric
1/3 teaspoon red pepper *optional
1/3 teaspoon cumin *optional
Oil

Method:
  1. Place the beans and the rice in a large pot, add 6 cups of water, and bring to a boil on medium-high heat.
  2. Add the small pieces of kohlrabi, salt, pepper, cover, and cook for 45 minutes on low heat.
  3. Periodically check to see if you need to add more water to the soup.
  4. Add the chopped vegetables, taste and adjust the seasoning, add more hot water if needed, and let it simmer for another 15 minutes for the flavors to blend in.
  5. In the meantime, fry the sliced onions in 3-4 tablespoons of hot vegetable oil in a skillet until golden brown. Add the turmeric powder and the minced garlic to the oil, stir, and saute further for another five minutes.
  6. Add a large tablespoon of the fried onion to the soup and gently mix well.
  7. Lightly fry the cubed kohlrabi in 2-3 tablespoons of hot vegetable oil until soft and golden on medium heat. Add a pinch of salt, turmeric, cumin, and red pepper and stir well.
To serve, ladle the soup into a soup bowl, top with the fried onions and kohlrabi. Serve hot with bread and yogurt.

Enjoy!

September 13, 2011

Kateh - Persian Style Plain and Simple Rice


We're in the final days of summer, and even as I savor every lingering warm evening, I feel a deep sense of gratitude and excitement for the arrival of fall and the start of another school year. The days of holding my daughters' little hands and walking them to the line outside of their classrooms have long since passed, but the memory is as vivid as ever. 

I still remember my eldest daughter's first day of first grade, how she walked into the classroom with such cheerful confidence while I stood there blinking back tears. As I turned and walked away, the realization washed over me: this was the beginning of a long journey into the world, a journey she would eventually take without me holding her hand. 

I have always wanted my girls to be independent, to stand firmly on their own two feet, to roam freely and bravely through life. But the truth is, letting go is never quite as easy as you imagine.


 I remember my own first day of first grade very clearly, but what stands out even more is the night before. In Iran, the school year begins on rooz-e aval-e mehr, the first day of the month of Mehr on the  Persian solar calendar, which also marks the first day of fall, the autumnal equinox on September 23rd.

That year, the night before school started was pure chaos in our home, with three older siblings in high school, another in elementary school, and a newborn baby brother; the house buzzed with noise and movement. Somehow, in all the commotion, as I was getting ready for bed, I realized I had no book bag, no lunch box, and no school uniform for the morning. I went to bed with the butterflies in my stomach, worried and unsure how I would show up for my next day.

But when I woke up,  everything had changed. There beside my pillow sat a brand-new lunchbox, a beautiful new book bag, and a hand-sewn uniform stitched by my mother. I never asked my parents how they managed to pull it all together so late at night. Some moments are too magical to disturb.

 First Grade Lesson, (Persian Alphabet)
کته Kateh is the easiest and quickest way to prepare rice, and it also happens to be the first recipe I learned to cook as a child.  My mother taught each of us how to make kateh when we were young. This simple, no-fuss method involves combining about two parts of water to one part cleaned and rinsed rice in a pot, adding a bit of salt and oil, and letting it gently simmer over low heat. 

I have posted many rice and polow recipes over the years, and except for dami baghali, they all follow the traditional method: bringing a large pot of water to a boil, adding the rice, draining it, and then steaming the parboiled rice with or without other ingredients. Kateh, however, uses the absorption method; nothing is drained, and the rice cooks until the water is fully absorbed. The grains may not turn out as fluffy as a classic polow, but they are more flavorful.


Depending on the type of rice, you may need to adjust the water-to-rice ratio. I prefer basmati rice for its flavor and beautiful aroma, and because it's the closest to the fragrant rice grown in the northern region of Iran. For less sticky, fluffier, and firmer kateh, use 2/3 cups of water for every cup of rice.

There's also the old Persian method of measuring the water for rice by simply covering the rice in the pot until it reaches the first joint of your index finger. with enough water in the pot to reach up to the first joint of your index finger. You can make kateh even more easily by using a rice cooker. But personally, I don't recommend it. There's a special joy in preparing a meal the old-fashioned way: taking the time, the care, and the small effort that turns a simple pot of rice into something meaningful and comforting.


Kateh - Persian Style Plain and Simple Rice

Ingredients

Serves 4

-2 cups dry basmati rice
-4 cups water
-Salt to taste
-butter or vegetable oil

Method:
  1. Rinse the rice 2-3 times with cool water or until the water runs clear, and drain well. 
  2. Place the rice in a medium pot, add 4 cups of water and 1/2 teaspoon salt. Bring to a boil on medium-high heat.
  3. Once the water reaches a boil, add 2 tablespoons of oil or butter, depending on your preference, and gently stir once or twice with a wooden spoon.
  4. Wrap the lid with a clean dishcloth, cover the pot, and cook on low heat for about 30-40 minutes.
Serve the rice on a platter with yogurt, salad, or your favorite khoresh.

Enjoy! Happy Autumn!

August 20, 2011

Salade Khorfeh - Shirazi Style Purslane Salad


Wouldn't it be nice to walk into your local farmers' market and find bunches of fresh khorfeh (purslane) bundled up and stacked neatly next to the basil and mint on the shelf? I am hopeful that one-day purslane will no longer be considered as just an annoying garden weed that's neglected.  Perhaps if instead of sprouting in every corner purslane was sowed and watered in vegetable gardens then it might have been appreciated more for its nutritional values, beauty and taste. But until then I am grateful that purslane grows everywhere and I can easily spot them on the lawn, in flower beds and next to the garden rocks. I appreciate purslane's generous and humble nature. This year, I have removed some of the purslanes and transplanted them into flower pots to use for cooking. These beautiful and succulent herbs have a distinct sweet and sour taste and are a perfect addition to a cucumber and tomato summer salad.


For this recipe I used small, young leaves of purslane that will go well with tiny pieces of Persian cucumber, firm tomatoes and onion known as salad shirazi.  The combination of these three main ingredients with the lemon juice and olive oil salad dressing is simply a perfect side to many delicious Iranian dishes. If the leaves are broad you may want to chop them into smaller pieces to blend well or just use the tender small leaves. سالاد خرفه Salade khorfeh goes well with khoresh bademjan. A spoonful of aromatic basmati saffron rice mixed with the velvety texture of eggplant sauce and topped with this tasty and crunchy salad is truly amazing!


Last summer, I posted a recipe for mast-o-khorfeh (yogurt with purslane). Tokhm-e khorfeh (purslane seeds) are used as a topping for naan berenji.


Salade Khorfeh - Shirazi Style Purslane Salad

Ingredients:
Serves 4-6

2 cup purslane leaves
5 Persian cucumbers or any small and seedless cucumbers, peeled and cut into small pieces
4 firm plum tomatoes or any small ripe tomatoes, cut into small pieces
1 small onion, (red or yellow), cut into small pieces, I used red onion.
1 teaspoon dried mint 
1/3 cup olive oil or vegetable oil
1/3 cup fresh-squeezed lemon juice
Salt and pepper to taste

Method:
  1. In a large mixing bowl combine purslane, cucumber, tomatoes, onion and dried mint.
  2. Add the lemon juice, olive oil, salt and pepper and mix well. Taste, adjust the seasoning and serve.
Serve this beautiful and delicious salad cold or at room temperature with your favorite dish.

Enjoy!

July 31, 2011

Kabab Koobideh - Persian Grilled Ground Lamb On Skewers

Persian Grilled Ground Lamb on Skewers

I just couldn't let my third summer of blogging pass by without posting a recipe for the internationally-known Iranian dish: kabab koobideh/kabob kubide. In addition to this popular kabab, there's also the well-known kabab barg (grilled skewered lamb tenderloin) and the delectable joojeh kabab (grilled chicken), as well as many other types of kababs, which are served with chelow, the parboiled and steamed rice.


In our home, grilling has become one of the rituals and pleasures of the summer, but usually by mid-October, the gas grill gets cleaned, covered, and put away for the rest of the year until the trees bloom once again. On the other hand, growing up in Iran, it was always grilling season! Kababs were made all year-round, regardless of the weather conditions. Our barbecue grill was an old, overused but sturdy rectangular manghal (portable charcoal grill) left in the faraway corner of the yard year-round. But on kabab days, in a matter of minutes, my mother would bring the manghal to the center of the yard, place some zoghal (wood charcoal) in it, and start the fire. When the coals looked hot and glowing, she would place the kabab skewers on the fire. Kababs, like any other meal, were made solely by my mother from start to finish. She had the required ease and speed in preparing the meat, fanning the charcoal using a bad-bezan (straw hand fan), and at the same time frequently turning the skewers over so the meat wouldn't fall off. Then the cooked kababs and grilled tomatoes would be placed in between layers of fresh taftoon (flat bread) and immediately taken to the dining room table, where the aromatic rice, a small bowl of sumac, fresh basil leaves, quartered raw onions, yogurt, and a pitcher of ice-cold doogh (yogurt drink) were already placed.


Traditionally, کباب کوبیده koobideh is made with ground lamb. However, ground lean beef or a combination of the two could be used too. This is the kind of kabab that needs meat with some fat on it. Koobideh is basically made with very few ingredients, consisting of ground meat, grated onion, salt, and pepper. Adding a teaspoon of sumac, turmeric, saffron, or any other ingredient is totally optional and depends on one's individual tastes and preferences. I'm not a big fan of using (joosh-e shirin) baking soda in cooking, but a few times I have taken my friend's advice and added a teaspoon of baking soda to tenderize the meat mixture, and I liked the result. I like to buy the meat on the same day that I'm grilling, but if you decide to do your shopping a day in advance, it's better to prepare the mixture and keep it in the refrigerator. Kababs are always served with grilled tomatoes, but grilling other vegetables such as onions, hot green peppers or corn is optional. Serving this dish with raw eggs on top, as was common in the past, is no longer advisable due to health reasons.


Kabab Koobideh - Persian Grilled Ground Lamb On Skewers

Ingredients:
 Serving: 8 skewers

2 pounds finely ground lamb (grind it 2-3 times)
1 large onion, grated, and squeeze out the juice
1 teaspoon salt or to taste
1 teaspoon black pepper or to taste

For Grilled Vegetables:

4 medium firm and ripe tomatoes, cut in half
2 medium onions, quartered (optional)
8 hot green peppers (optional)

 Method:

  1. In a large bowl, combine all the ingredients and mix well with your hands until the mixture becomes well blended and sticky. Set aside at room temperature for at least an hour.
  2. Leave a bowl of water next to you on the counter for dipping your hands to prevent stickiness while placing the lamb on the skewers.
  3. You may divide the ground lamb into equal portions in advance or take a handful and shape it into an oval and place it on a flat and long metal skewer, and press it onto the skewer, making sure that both ends are sticking as well. The thickness and the length of the kababs depend on your preferences. When all the skewers are done, set aside for at least half an hour.
  4. Turn on the gas grill and make sure it's very hot, and then one by one, place the skewers on the grill. Turn each skewer over quickly and continue to do so until the lamb is browned on both sides and well-cooked.
  5. Place the vegetables directly on the hot grill, or place them on the thin metal or wooden skewers and grill over the flame.
Set the table in advance, place all the necessary condiments you would need for the meal, serve the rice on a platter, and then bring the kabab platter to the table with the grilled vegetables.

Enjoy!

July 16, 2011

Dami Baghali -Turmeric Rice With Yellow Fava Beans and Caramelized Onions


دمی باقالی/باقلا Dami baghali is a combination of rice and dried yellow fava beans cooked together slowly over low heat. The result is a flavorful rice and beans dish that is best served with a bowl of mast-o-khiar, salad Shirazi or torshi (my favorite). Nothing beats having this delicious home-cooked meal on a summer day with your family. Dami baghali is one of my husband's favorite dishes and he is usually the one who buys the fava beans for this dish or anything that resembles them! Not too long ago though he mistakenly bought lupini beans instead of fava beans from an Italian market. I still haven't figured out what to do with all these beans and how to cook them.


There are different recipes for this rice and beans dish, and the difference basically depends on one's tastes and preferences. Some would add a tablespoon of tomato paste or fresh chopped tomatoes. Some serve it with fried eggs (sunny side up), and some people prefer it hot. It may also be served with lamb shanks. The following recipe is how I like to make and serve dami baghali in our home, simple with no meat and with caramelized onions on top. I also like to use equal portions of rice and fava beans. However, it is more common to use anywhere from 1/2 cup to two cups more rice than fava beans. Instead of increasing the amount of rice, you may reduce the fava beans to 1 1/2 cups in this recipe if you like.


Dami Baghali -Turmeric Rice With Yellow Fava Beans and Caramelized Onions

Ingredients

Serves 4

1 1/2 cups dried yellow skinless fava beans
2 cups white long-grain rice
2 large yellow onions, one onion diced finely, one sliced thinly
1 teaspoon turmeric
1/2 teaspoon cumin powder
A pinch of red pepper (optional)
Salt to taste
Vegetable oil or olive oil


Method:
  1. Rinse and soak the beans in 4 cups of cool water for a couple of hours. Drain. 
  2. Rinse the rice with cool water and soak it in 4 cups of water with 2 tablespoons of salt for about an hour before cooking. Drain.
  3. Heat about 3 tablespoons of vegetable oil in a large heavy-bottom pot over medium heat. Add the chopped onions, saute until lightly golden brown. Add turmeric, stir well. Add the beans, cumin, and red pepper. Cook over medium-low heat for 10 minutes. Stirring intermittently.
  4. Add the rice to the pot and pour enough water to cover the rice and the beans about an inch above the rice. Bring to a gentle boil over medium heat. Cover the lid with a clean kitchen towel to absorb the moisture. Cover the pot and cook for about 45-50 minutes on low heat.
  5. In the meantime, saute the remaining sliced onions in 3 tablespoons of olive oil. When the onions become soft and transparent, reduce the heat to low and let them caramelize slowly.
Serve rice on a platter, spoon the caramelized onions over top, and serve with mast-o-khiar, salad shirazi or torshi.


***

It would be nice to have love reciprocated 
one sided love is trouble
if Majnun's heart was filled with maddening love
Layli's heart was brimming with more intense love
~Poem by:  Baba Taher

Enjoy!

June 24, 2011

Persian Koofteh Berenji - Rice Kufta (Guest Post)


Koofteh Berenji

 کوفته برنجی Koofteh berenji (rice meatballs) made with rice, beef, yellow split peas, finely chopped fresh herbs, and stuffed with chopped walnuts and prunes, simmered in a simple and tasty tomato sauce, is a flavorful main dish.

Koofteh Berenji

Koofteh Berenji - Rice Kufta

Ingredients

Makes about 10 Koofteh

-1 pound lean ground lamb or beef
-1 cup rice
-1 cup yellow split peas
-2 large onions, one grated and one thinly sliced
-1 egg
-1 bunch fresh flat-leaf parsley, washed and finely chopped (1 cup packed)
-1 bunch of fresh dill, washed and finely chopped
-1 bunch of fresh chives or scallions (green parts only), washed and finely chopped
-1 bunch of fresh tarragon, washed and finely chopped
-2 tablespoons chickpea flour
-2 tablespoons tomato paste 
-1 1/2  teaspoon turmeric
-1/4 teaspoon powdered saffron dissolved in 2-3 tablespoons of hot water
-Salt and pepper to taste
Olive oil


For the Filling:

Barberries, prunes, fried onion, walnuts

Method:
  1. Wash the rice a couple of times. Drain. In a medium-sized pot, mix the rice, 2 cups of water, and 1/2 teaspoon salt. Bring to a boil over medium-high heat, reduce the heat, and simmer for 15 minutes. Set aside to cool. 
  2. Place yellow split peas and 4 cups of water in a medium-sized pot, bring to a boil, reduce the heat, and cook for about 30 minutes on medium heat. If the liquid is left, drain and set it aside to cool.
  3. In a large bowl, combine the rice, peas, ground meat, onion, chopped vegetables, chickpea flour, turmeric, saffron, salt, and pepper to taste.
  4. In a small bowl, whisk the egg and blend in well with the rest of the ingredients. Take a handful or 1/4 cup of the mixture and shape it into a ball. You make a hole in the middle and stuff some barberries, raisins, walnuts, and fried onions inside.
  5. In a large pot, saute sliced onions in 3 tablespoons of oil over medium heat. When transparent, add 1/2 teaspoon of turmeric and saute for another 2-3 minutes. Add in the tomato paste and continue cooking for another 5 minutes, stirring well.
  6. Pour 5 cups of water into the pot, bring to a gentle boil, and one by one place each koofteh into the pot, and cook for about 50-60 minutes on medium-low heat.  Do not cover the pot completely. You may place a colander upside down over the top. Taste and adjust the seasoning and add more water if necessary. 
Serve warm with mast o khiar, pickles, sabzi khordan (fresh herbs), and bread.

Enjoy!

June 02, 2011

Mint Cucumber Sekanjabin Ice Pops - Ancient Persian Drink Meets the New World


Summer is almost here, with its typical hot and humid weather and the all too familiar music of the ice cream truck driving through the neighborhood, followed by the excited screams of the neighbor's kids. So, I thought what better way to welcome the summer than with a mint and cucumber سکنجبین sekanjabin - but not the usual ancient cool beverage or the syrup dip served with fresh lettuce, but as ice pops! These are not your average frozen pops. They have the sweet and sour combination flavor that is typical of Iranian cuisine, with vinegar and honey/sugar. Ice pops are a wonderful treat any time of the year but having a tasty ice pop on a hot summer day is just a delightful experience. I still remember the taste of the orange popsicles that I used to buy from the corner grocery store of my grandmother's house in Tehran. When my children were little, they enjoyed their ice pops from the ice cream truck after swimming in the pool in the summer. Now, I usually get a box or two of multi-colored ice pops and that lasts us the entire summer.


سکنجبین - Sekanjabin syrup is usually served in a small bowl and eaten with fresh lettuce leaves. Sekanjabin drink is made with 2-3 tablespoons of sekanjabin, ice, water and grated cucumbers. Even though I absolutely love the taste of sekanjabin now, I didn't appreciate its strong flavor and aroma as a kid. Now, by trying to turn this delicious drink into a بستنی یخی bastani yakhi popsicle, I'm hoping it will appeal to the younger generation and those of us kids at heart. This is a simple recipe and a fun one to do with the kids over the summer. I have made few changes in my sekanjabin recipe to make these pops more palatable.


Long before the discovery of electricity and the invention of the refrigerator, having an ice-cold drink on hot summer days required some planning, hard work and patience. Yakhchal (ice pits) were built in hot and dry areas to make ice during the winter and to preserve it for use in the summer. As a child, I visited one of these yakhchals in the south of Tehran with my mother. The image of that man-made ancient refrigerator, which was made out of mud and clay, is still etched in my mind and makes me appreciate making ice-pops in a much more convenient freezer.


Mint Cucumber Sekanjabin Ice Pops - Ancient Persian Drink Meets the New World

Ingredients:
Makes 8 pops

1/2 cup honey *(I used orange blossom honey for its delicate scent and mild flavor but any other fruit flavored honey will do)
2 tablespoons sugar
1/3 cup apple cider vinegar *(I chose apple cider vinegar over white vinegar for its milder taste and for a bit of a fruity flavor)
2 1/2 cups water
1/2 teaspoon lemon zest *(to add a hint of citrus taste)
1 small bunch of fresh mint, washed
3 Persian cucumbers, shredded or thinly sliced
1 teaspoon rosewater

Method:
  1. In a heavy-bottom pot, combine honey, sugar and water, place on medium heat, bring the water to a boil, stir until honey and sugar are dissolved, lower the heat, and simmer for about 10-12 minutes or until it thickens a little bit. 
  2. Add vinegar, lemon zest and mint leaves, stir and simmer for another 7-8 minutes.
  3.  Remove foams with a wooden spoon. Taste and adjust the flavors.
  4. Add a teaspoon of rosewater, remove from heat and let cool completely and then strain it through a fine-mesh sieve. 
  5. Place a teaspoon of shredded cucumber and a couple of mint leaves in each mold. Pour the mixture into Popsicle molds. I used this ice pop mold. Insert the ice pop sticks and place in the freezer until firm, about 3-4 hours.
Enjoy!

May 01, 2011

Borani Kangar - Persian Yogurt and Cardoon Dip


A few weeks ago I came across an interesting online copy of an old and rare Iranian cookbook, dating back to the last years of the Qajar dynasty, written in beautiful Persian Nastea'liq handwriting. This cookbook may give us a tiny glimpse into the dynasty that ruled Iran from 1794-1925. Most of the recipes are brief and not easy to follow and some of them seem to be merely a translation of European recipes into Persian. The majority of the recipes basically include the list of the main ingredients with little directions. For those who are interested to see this document please click the following link Women's Worlds in Qajar Iran.


While browsing the book, the recipe for بورانی کنگر borani kangar, also known as mast-o-kangar (yogurt with cardoons), caught my attention. That's when I decided to give it a try but the problem is that I have never seen Iranian kangar anywhere. Kangar looks like a thin celery with thorns and has a very delicate taste and they are in season for a very short time, a few weeks at most. Yogurt and cardoon dip has a distinct flavor and even though it may take some time and effort to prepare cardoons it is definitely worth it.


Luckily, a few days later I was able to find cardoons that are a good substitute for kangar in John's Farm, an Italian vegetable market. However, fresh cardoon has a bitter taste and needs to be soaked or cooked in salted water. Also, in order to prevent cardoons from changing colors during preparation they need to be placed in acidulated water. I found the following link helpful in Preparing Cardoons.


Borani Kangar - Persian Yogurt and Cardoon Dip

Ingredients:
Serves 4

1 bunch cardoons
2 1/2 cups plain yogurt
1-2 garlic cloves, minced *optional
2 tablespoons olive oil
Salt and pepper to taste

Method:

  1. To prepare cardoons remove all leaves and thorns, peel strings with a peeler, cut the stalks into small pieces.
  2. To prevent discoloration place the cardoons in a bowl of water and juice of two large lemons for ten minutes.
  3. In a large pot bring 4 cups of water to a boil on medium heat, add 2 tablespoons of salt and cardoons. Cook for 10 minutes or until tender and drain. 
  4. Chop cardoons finely by hand or use a food processor.
  5. Heat 2 tablespoons olive oil in a pan, add minced garlic and saute for 2 minutes. Then add the chopped cardoons and saute lightly for 5-7 minutes. Add a pinch of salt and pepper. Let cool.
  6. Combine yogurt and cardoon garlic mixture together, taste and adjust the seasoning. 
  7. Place borani in a serving bowl and garnish with dried mint. I also used crushed walnuts and barberries but that's optional. Serve it as an appetizer cold or at room temperature with your favorite dish or any party meals.
*Variation: Combine chopped cardoons with yogurt, mix well and add salt and pepper to taste and skip step #5 in the above recipe.

Enjoy!

April 23, 2011

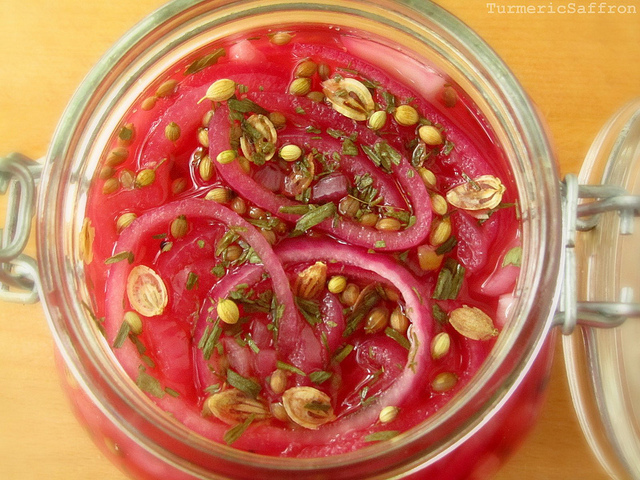
Torshi Piaz - Pickled Red Onions and Pickled Small White Onions


This quick ترشی پیاز torshi-e piaz is easy to make and doesn't require a long aging process before they can be eaten. Torshi is a very popular condiment that is served along with meals at lunch or dinner. There are almost as many different torshi varieties as there are popular vegetables and some pickles are made with more than one kind of vegetable. For example, the Iranian-style vegetable pickle recipe (torshi makhloot) calls for eight different vegetables that are cut into tiny pieces combined with many fresh and/or dried herbs and spices. There is also torshi miveh (fruit torshi), my mother's special recipe that's made with many different fruits and vegetables and is the only torshi that tastes a bit sweet because of the addition of dates and a piece of nabat (rock candy). Torshi is mostly made with vinegar and the taste is rather "torsh" (sour), hence the name. I find pickling very enjoyable and rather calming. Perhaps because it's not an everyday activity like cooking or maybe it's the idea of preservation that's appealing or simply the fact that torshi is delicious and irresistible.


Onions are widely used in Iranian cuisine. Usually, making piaz dagh (fried onions) is the first thing I do when I start to cook any kind of khoresh. Fried onions are also used as a garnish for ash (hearty soups) and some rice dishes. Onions are also served freshly sliced or sectioned with main dishes such as chelo kabab, lamb stew (abgoosht) and most rice and khoresh varieties for lunch. Sauteed, caramelized, pickled, or raw onions absolutely enhance the flavors of most dishes and are essential in cooking.


Thinly sliced, gorgeous pickled red onions and the petite pearly white pickled onions would make a good substitute for the raw onion that many of us grew up with and still enjoy (mostly on weekends).

Pickled Red Onions

Ingredients:

1 1/2 pounds medium red onions, peeled, thinly sliced
3-4 cups white distilled vinegar
2 tablespoons dried tarragon (tarkhoon)
1 tablespoon dried savory (marzeh)
1 tablespoon coriander seeds (tokhm-e geshniz)
1 tablespoon crushed angelica (golpar)
1 tablespoon nigella seeds (siah daneh) *optional
1 red hot dried pepper
3 tablespoons salt

Method:
  1. In a small bowl combine dried tarragon, savory, coriander seeds, crushed angelica and nigella seeds. 
  2. Pour vinegar in a non-reactive pot, place on the stove and bring to a gentle simmer on medium-low heat.
  3. Stir in the spice mix, add the red pepper and let it gently simmer for about five minutes.
  4. Place the sliced onions in the pot with vinegar and spices, add salt, gently stir with a wooden spoon, simmer for another 5-7 minutes.
  5. Remove from heat and let vinegar cool to room temperature.
  6. Pour the onions and vinegar into a clean and dry glass jar with a tight-fitting lid. Make sure all ingredients are covered by vinegar. Add more vinegar if needed. Close the lid tightly.
  7. Store in a dry and cool place.
  8. This pickle is ready in 2-3 days.
***

Pickled Small White Onions

For pickled white onions, you may use the same spices listed in the above recipe and a pinch of turmeric for a tastier torshi. However, if you would like the onions to maintain their color, here's a simpler recipe with only a few ingredients.


Pickled Small White Onions

Ingredients:

1 pound small white onions, trim both ends of onions and peel
3-4 cups white distilled vinegar
3 tablespoons salt
1 red hot dried pepper
1 whole fresh tarragon (with leaves attached to stem), washed and placed on a paper towel to completely dry

Method:

  1. Bring vinegar to a gentle simmer in a medium non-reactive pot on medium-low heat.
  2. Place the onions and the red pepper into the pot, add salt and stir. Simmer for 5-7 minutes.
  3. Remove from heat and let cool completely.
  4. Transfer the onions and vinegar into a clean glass jar.  Place the whole tarragon and the pepper in the center of the jar, for easy removal later on. Add more vinegar if needed.
  5. Close lid tightly. Keep in a cool and dry place.
  6. This pickle is ready in 2-3 days.
Enjoy!

April 10, 2011

Ash-e Somagh - Persian Herb and Sumac Soup


It may officially be spring but the weather is still cold and windy. That means there's still plenty of time to make a warm pot of soup. This is also a good opportunity for me to use the recipe that inspired me in the only Iranian cookbook that I own! This cookbook was given to me by mother when I left home many years ago and  is called "Noosh-e Jan Konid" (Bon Appetit), by Mansoureh Amir Ebrahimi, which was published in Tehran. I don't know much about khanoum Amir Ebrahimi; in the introduction she writes that she had a cooking radio show called "Zan O Zendegi" (Woman and Life) and she decided after ten years to turn the recipes from her radio program into a cookbook. That's perhaps the reason why my mother found out and chose this book for me to take on my long journey abroad. Sometimes, a gift will last you a lifetime! I can imagine her listening to Mrs. Amir Ebrahimi's program in the morning while tidying up our rooms, rearranging furniture and preparing lunch. Well, for many years I had no use for a cookbook, I basically lived on cafeteria food, fruits, yogurt and bread. I kept the book in a box with the rest of the books and magazines that I accumulated over the years. I re-discovered it during my recent spring cleaning and decided to pay tribute to this less well-known author and her cookbook. I have searched her name on the Internet but unfortunately I have not been able to find much information on her. I am becoming increasingly passionate about preserving what's been good in the past and to pass it along.


I chose آش سماق  ash-e somagh recipe to highlight because it's rich, creamy, comforting and delicious. However, I made a few changes. The original recipe calls for small meatballs but I decided to make a vegetarian soup with lentils instead. If you prefer, you can add meatballs to the soup. The recipe also calls for either rice flour or small broken rice to reduce the cooking time and perhaps to make the texture more smooth and creamy. I used basmati rice and it turned out well. Also, since the amount of ingredients recommended in the recipe were more than what I usually make for our family of four I decided to cut down the amount of rice, herbs and sumac. Finally, I served ash-e somagh with the usual caramelized onion, garlic and mint topping.


Sumac gives this soup a subtle tangy taste. Sumac is mostly sprinkled on kabab dishes for extra flavorings. Growing up, sumac was always on the table alongside salt and pepper.


Ash-e Somagh - Herb and Sumac Soup

Recipe adapted from Noosh-e Jan Konid by Mrs. Mansoureh Amir Ebrahimi

Ingredients:
Serves 4-6

1 cup rice, rinsed
1/2 cup lentils, rinsed
3-4 tablespoons dried sumac, soaked in 1/2 cup of cool water for an hour
1 cup finely chopped fresh flat-leaf parsley, hard stems removed
1 cup finely chopped fresh cilantro
1 cup finely chopped fresh chives or scallions (green parts only)
1/4 cup chopped fresh tarragon, hard stems removed
A few sprigs of mint, washed and chopped
Salt and pepper to taste
Water

Topping:

1 large onion, cut into small pieces or thinly sliced
4-5 garlic cloves, finely chopped
1-2 tablespoons dried mint
1/2 teaspoon turmeric
2-3 tablespoons extra virgin olive oil

Method:
  1. Put the rice in a large stew pot, add 8 cups of water, bring to a boil on medium-high heat. Then lower heat to medium-low and cook for 10 minutes, stirring occasionally.
  2. Pour in the lentils, stir well, cover and cook for 30 minutes. Add water if necessary. Always add hot water to the stew that's cooking on the stove. Cool water will interrupt the simmering/boiling process.
  3. Stir in the chopped herbs into the soup. Add salt and pepper to taste and let it simmer on low heat for another 10 minutes.
  4. You may drain sumac in a very fine mesh strainer and add the liquid into the soup as suggested in the book or pour in the soaked sumac and all liquid and cook for another 10-15 minutes. Taste and adjust the seasoning to your liking.
  5. In the meantime, saute onions in hot oil. When golden brown, add turmeric, stir well, mix in the garlic and mint, and saute for another 5 minutes on medium heat.
  6. Add some of the fried onion mixture into the soup, stir well and save the rest for garnish.
Ladle the soup into a serving bowl, garnish with fried onion and drizzle some of its oil, sprinkle a little bit of sumac and serve with warm lavash and yogurt. Ash-e somagh may be served hot or cold.

* For ash-e somagh with meatballs, combine a pound of ground meat (lamb, beef or turkey), salt, pepper, a handful of chopped herbs, 1 small grated onion, one egg, 1 tablespoon of flour, mix well. Make tiny meatballs, brown on all sides in hot vegetable oil and add to the soup half way through cooking.


Enjoy!