Showing posts with label Side Dish. Show all posts

August 02, 2021

Mast-o-Moosir with Chips and Crudités

Mast o Moosir

موسیر Moosir (Allium stipitatum) is a native plant that grows wild across Iran's Zagros Mountains. Its white oval bulbs are harvested, peeled, thinly sliced, and dried. Outside of Iran, moosir can be difficult to find, though dried moosir is available in Persian or Middle Eastern markets and online. 

This traditional and refreshing dish combines yogurt with chopped moosir. It's also used in torshi makhloot (mixed vegetable pickles). With a subtle garlic-like flavor that is milder than garlic itself, moosir brings a distinctive taste to Persian cuisine. 

Moosir

Persian Yogurt Dip with Chips

Persian Yogurt Dip with Crudités


Mast-O-Moosir (Yogurt with Persian Shallots)

Ingredients

Serves 4-6 

-3 cups thick yogurt (preferably whole milk)

-1 cup dried moosir, rinsed well, soaked in water 5-6 hours (changing the water a few times), drained and finely chopped

-Salt and black pepper to taste

-Garnish: dried rose petals, dried mint

Method

  1. In a large bowl, combine the yogurt and finely chopped moosir, season with salt and pepper.
  2. Cover and refrigerate for 2 hours.
  3. Garnish with dried rose petals and dried mint. 
Serve with potato chips, pita chips, or a platter of fresh vegetables such as cucumber, celery, carrots, broccoli, and radishes. It also makes a delicious side dish.

Enjoy!

September 19, 2016

Kookoo Khorfeh - Purslane Kookoo


Every year from mid-spring to late summer, I eagerly await the appearance of dark-green خرفه (purslane) sprouts in my backyard, peeking through the vegetable garden, flower borders, and even the cracks between the cement. Often under-appreciated and overlooked, purslane has always been one of my favorites.  A handful of fresh succulent leaves can elevate almost any dish, adding a slightly tart and peppery flavor. Packed with omega-3 fatty acids, fiber, vitamin A, vitamin B, and many other nutrients, purslane is as nourishing as it is flavorful. 


Purslane (portulaca oleracea) has been labeled as a garden weed by the U.S. Department of Agriculture, and I gave up looking for it in stores long ago. In Iran, and in many other countries, khorfeh (purslane) happens to be a popular summer green. I'm always looking for different ways to prepare it, but with the little purslane I manage to gather, I can't get too creative! I usually add it to salad shirazi, mast o khiar, sabzi khordan, and even fruit salads. Tokhm-e khorfeh, purslane's black seeds, are used in Iranian baking and sprinkled over naan berenji and shirini keshmeshi for extra flavor.


On a recent trip to the grocery store, I was delighted to find rows of purslane nicely stacked on the shelf, imported all the way from Mexico! I bought a few bunches and then decided to make کوکوخرفه kookoo khorfeh - purslane kookoo with parsley, chives, and caramelized onion.


Now that summer is almost behind us, only a few purslane plants are remaining in the garden, and I wanted to share this recipe before the season officially ends. I usually find it much easier to bake kookoo sabzi in the oven rather than cook it on the stovetop; it's simpler and doesn't require flipping the wedges halfway through. For this recipe, though, I chose to make it the traditional way on the stovetop, just as my mother used to cook almost all her dishes. I know many of you like to add a bit of baking powder to your kookoo for a lighter texture, dishes, so feel free to mix in about a teaspoon if you prefer.


Kookoo Khorfeh - Purslane Kookoo

Ingredients

Serves 4-6

-2 bunches of purslane (about 2 cups chopped), use the leaves and the thin part of the stems, discarding the thicker ends
-1 bunch fresh flat-leaf parsley ( about 1 cup chopped)
-1 bunch fresh tareh (chives) or scallions (green parts only) (about 1 cup chopped)
-6 large eggs, beaten
-1 medium yellow onion, thinly sliced
-1 tablespoon finely diced walnuts (optional)
-1/2 teaspoon turmeric
-1/2 teaspoon paprika 
-1/2 teaspoon salt
-1/4 teaspoon black pepper
-A pinch of red pepper 
-Vegetable oil or olive oil for frying

Method:

  1. Heat 2 tablespoons of oil in a skillet over medium-high heat. Sauté the onion slices until translucent, then add the turmeric and stir. Reduce the heat and continue cooking, stirring occasionally, until the onions are golden brown. Set aside.
  2. In a large bowl, combine the chopped purslane, parsley, chives, caramelized onion, walnuts, eggs, paprika, red pepper, and season with salt and black pepper. Mix until well blended.
  3. Heat 3 tablespoons of oil in a 10-inch skillet over medium heat. Pour in the egg mixture, and spread evenly. Cover and cook on low heat for about 30 minutes. Cut the kookoo into 8 wedges, turning each piece carefully halfway through cooking with a fork and spatula. You can also slice the kookoo after it is fully cooked. 
Serve warm or at room temperature with mast o khiar, salad shirazi, torshi, and warm bread.

Enjoy!

February 02, 2015

Ode to Choghondar (Beets) + Recipes for Laboo and Kookoo Barg-e Choghondar (Beet Greens)


One wintry day long ago, during one of our trips to Tehran, I remember accompanying my mother as she went all over town running errands and shopping. It was getting late, and we were hurrying to get home before dark when my mother stopped at a دکه ی لبو فروشی - dakeh-ye laboo forooshi (street vendor stand selling beets). Many large, glazed purple/red beets were stacked neatly with some floating in their juice on a large tray. How do they make such simple and inexpensive street food so delicious? There must be an ancient secret recipe among the beet vendors in Iran - one that I would really love to get my hands on. Biting into a perfectly sweet, tender, and warm laboo in the snow after a seemingly endless day was especially gratifying. لبو/ چغندرپخته Choghondar pokhteh/Laboo (cooked beets) happens to be one of Iran's popular street foods throughout the winter months. And this recipe brings the cherished memories of my youth back home in Iran.


چغندر - Choghondar (beet) is highly nutritious, low in calories, quite versatile, and has a gorgeous color. Beets can be thinly sliced or grated raw into salads, steamed, boiled, or baked. Beets can also be used in both sweet and savory dishes. Those who love the earthy taste of beets can enjoy them throughout the year since they're always available in the market.


I have tried various ways of preparing beets. The simplest one is to roast them until tender and just serve them plain. Beets have a very high sugar content, and there's really no need to add any sugar/sweeteners. However, I am on a quest to achieve the delicious and flavorful taste of the laboo I had in Iran.

Laboo

I like to add honey for sweetness to the dish. You can use table sugar, brown sugar, or honey, whichever you prefer, and you can adjust the sweetness to your liking. In addition, adding a good squeeze of lemon juice will enhance the color as well as the flavor of beets. For this recipe, I peeled and sliced them before cooking. You can cook beets whole instead of slicing them. Just remember that beets stain everything, and you may want to wear gloves while peeling and slicing them.

Laboo - Beets

Ingredients

Serves 4-6 

-4 medium-sized beets, trimmed, peeled, sliced
-2 teaspoons white sugar or brown sugar, or honey (I used raw, unfiltered honey), use more if you like.
-2 tablespoons freshly squeezed lemon juice
Water

Optional garnish: chopped pistachios, sliced almonds

Method:

  1. Place the beets in a large heavy saucepan. Add enough water to cover the slices by 2 inches, bring to a boil for 2-3 minutes over medium-high heat. Reduce the heat to medium-low, cover, and cook for about 30 minutes.
  2. Add the lemon juice and honey, cover, and simmer over low heat for another 10-15 minutes or until beets are tender and glazed. Make sure there is some liquid left in the bottom of the pan.
To serve, place the beets in a deep serving platter, and pour 2-3 tablespoons of the remaining liquid over them. Sprinkle with almonds and pistachios and serve immediately as a side dish or snack.


Beetroot greens (leaves and stems) also have nutritional value and can be substituted into most recipes that call for spinach. It can be added to ash reshtehkookoo sabzi, or even ghormeh sabzi for a great flavor variation. After I cooked the beets, I decided it was about time to make a dish just using their greens, the under-appreciated and often discarded barg-e choghondar, and that's how this beautiful and delicious کوکوبرگ چغندر kookoo barg-e choghondar was created.

Kookoo Barg-e Choghondar


Kookoo Barg-e Choghondar - Beet Greens Kookoo (leaves and stems)

Ingredients

Serves 4-6

-2 cups beet leaves, chopped (I gave them a quick rough chop)
-2 cups beet stems, chopped
-1 medium yellow onion, chopped
-2-3 garlic cloves, minced
-4 eggs
-1 tablespoon flour
-1/2 teaspoon turmeric
-1 teaspoon salt
-1/2 teaspoon pepper
-A pinch of cumin (optional)
-A pinch of cayenne pepper (optional) 
-Vegetable oil

Method:

  1. In a medium frying pan, heat 2-3 tablespoons of oil, add onions, and saute over medium-high heat until light golden brown. Add turmeric powder and garlic, saute for another 2-3 minutes. Using a slotted spoon, remove fried garlic and onion from oil, and set aside.
  2. In a large bowl, whisk the eggs until well mixed.
  3. Add the green beet leaves, red stems, fried onion, garlic, flour, salt, pepper, cumin, and cayenne. Mix thoroughly.
  4. In a large skillet, heat 3 tablespoons of oil over medium-high heat, and gently pour in the mixture. Reduce the heat to medium-low, cover, and cook for 35-40 minutes. There's no need to turn them over. This way, they'll maintain their gorgeous color and fresh rustic look.
Serve warm or room temperature with warm bread, salad, mast o khiar, and torshi.

As I am sure many of you may already know, since I have already shared the news on my Facebook and Instagram pages, I was recently chosen by Yahoo Food as their blogger of the week. The following three recipes: Zucchini and Yogurt Salad, Fesenjoon, and Khoresh-e Karafs were featured during the week, along with a Q&A. I am truly honored and delighted.

Enjoy!

May 03, 2014

Torshi Liteh - Persian Pickled Eggplant and Vegetables with Sibzamini Torshi (Sunchokes)

Torshi Liteh

ترشی - Torshi (pickles) are a very common side dish in Persian cuisine, served alongside rice and khoresh, kebabs, and other traditional dishes. I've shared several of my favorite pickle recipes so far, including pickled eggplant and mixed vegetable pickles, among others. 

One of my favorites is لیته   (Liteh), a delicious combination of pickled eggplant, vegetables, and herbs. For this recipe, I'm thrilled to have finally found سیب زمینی ترشی - sibzamini torshi (pickling potato), also known as یارالماسی (yaralmasy). Sibzamini torshi, which is called sunchokes or Jerusalem artichokes, are members of the sunflower family. For further information, please check out the following link on sunchokes.


A few years ago, I asked my younger brother, who lives in Iran, to send me a picture of the sibzamini torshi, the kind cultivated there, because I didn't want to forget what they looked like. It wasn't until recently that, after leaving my dentist's office, I wandered into the Whole Foods Market across the street, and there, among the neat and organized fresh vegetables, was a small box of sunchokes. 

They resembled ginger roots closely, and they came in various shapes and sizes. I was so excited to have finally found what I had been searching for! I knew right away they would make a wonderful addition to torshi liteh, adding a subtle nutty flavor and a pleasant crunch.


 If you are unable to find sunchokes at your local market, simply leave them out, liteh is traditionally made without them anyway. For this recipe, you can use grilled eggplant instead of simmering it in vinegar. If using grilled eggplant, remove the skin, slice it, and mix it with the other ingredients. For the herbs, you can use fresh herbs if you prefer. I used dried herbs this time because I didn't have enough time to let the freshly washed ones dry completely.

Torshi Liteh

Torshi Liteh

Ingredients

-5 medium eggplants, stemmed and sliced lengthwise (I didn't remove the skin, but you can if you prefer)
-4-5 sunchokes, peeled, cubed
-2 large carrots, peeled, cubed
-2 celery stalks, diced small
-1 small head of cauliflower, cut into small florets
-1 medium green bell pepper, cleaned, cubed
-5 garlic cloves, thinly sliced

-2 tablespoons dried tarragon
-2 tablespoons dried mint
-2 tablespoons dried savory
-2 tablespoons dried dill
-2 tablespoons dried basil

-1 tablespoon crushed golpar (angelica)
-1 tablespoon siah daneh (nigella seeds)
-1 tablespoon crushed tokhm-e geshniz (coriander seeds)
-1 teaspoon turmeric powder
-1 small whole dried red pepper, crushed (or more to taste)
-Salt
-White vinegar

Method:
  1. In a non-reactive saucepan, combine 1 cup of vinegar and 1 cup of water. Bring to a boil over medium heat, then add the turmeric, eggplant, and 1 teaspoon of salt. Reduce the heat and simmer for 8-10 minutes.
  2. Remove the eggplant and place it in a colander to drain.
  3. In a large mixing bowl, combine the eggplant, sunchokes, carrots, celery, cauliflower, bell pepper, garlic, dried herbs, spices, and 3 teaspoons of salt. Mix well.
  4. Pack the torshi into the clean, dry jars, pressing down firmly. Pour vinegar over the vegetables until about 1 inch from the top. Seal the jars tightly. 
  5. Store in a cool, dark place to pickle for 10-12 days.
Enjoy!

July 14, 2013

Bademjan Shekam-por - Persian Stuffed Eggplant


بادمجان شکم پر - Bademjan shekam-por is an open-faced fried eggplant stuffed with ground beef and vegetables, simmered in a rich and tangy tomato-based sauce, and topped with slivered almonds. This flavorful eggplant dish originates from the northwestern region of Azerbaijan, Iran. 

It's worth noting that although you might see the word eggplant spelled and pronounced in several ways, بادمجان، بادمجون، بادنجان, بادنجون  (bademjan, bademjoon, badenjan, and badenjoon), they all mean the same thing. 

Eggplants have been an essential part of Persian cooking for hundreds of years. Their versatility, great flavor, and silky tender flesh have inspired countless dishes such as khoresh bademjan, borani bademjan, kashk-e bademjan, mirza ghasemi, and torshi bademjan (pickled eggplant), just to name a few. I am always on the lookout for new Persian eggplant recipes, and I've made it my mission to collect and write about every eggplant dish I come across from homes in every corner of Iran. Yet, despite the many variations and flavors, my personal favorite remains the simplest of all, pan-fried unpeeled eggplant slices lightly seasoned with salt and pepper. I love the taste of the eggplant skin, and I usually keep it on unless I'm serving guests.


According to a recent Huffington Post article about Persian Food, "Persian food is criminally underrepresented in America." I couldn't agree more, and I would add that it's misunderstood as well. One common misconception is that Persian food is not vegetarian-friendly, which, in my opinion, couldn't be further from the truth. Aside from the array of globally known Persian kebab dishes, most, if not all, khoresh (stews) can be prepared without meat. There are also many wonderful vegetable-based dishes, such as various kinds of kookoo/kuku, borani, and the hearty ash reshteh. Not to mention that a platter of sabzi khordan (fresh herbs) accompanies lunch and dinner almost every day, along with salad and torshi  (pickled vegetables). And of course, we eat fruits like there's no tomorrow!


For a healthier twist on the traditional bademjan shekampor, you can bake the eggplants in the oven before stuffing them instead of frying. In the traditional recipe, the eggplant is either fully peeled or partially peeled, leaving stripes of skin. Whether you choose to bake or fry, peel or leave the skin on, it all depends on your personal taste and dietary preferences. For a vegetarian variation, you may simply replace the ground beef with rice or a mix of rice and vegetables. Bademjan shekampor can be served as a main dish with rice or as a side dish or appetizer.


Bademjan Shekam-por - Persian Stuffed Eggplant

Ingredients

Serves 4

-4 medium-sized eggplant, peeled in stripes using a vegetable peeler
1/2 pound ground meat (lamb or beef)
-1 large onion, chopped
-3 medium potatoes, peeled and cubed (small)
-1/2 pound fresh green beans,  trimmed, cut into 1-inch pieces
-3 medium firm tomatoes, 1 finely diced, 2 sliced
-2 large garlic cloves, minced
-1 tablespoon tomato paste
-1/3 teaspoon turmeric
-1/4 teaspoon cumin
-A pinch of red pepper
-Salt and pepper to taste
-Juice of a lemon
-2-3 tablespoons slivered almonds
-Olive oil (extra virgin) or vegetable oil

Method:

  1. In a large skillet, heat 3-4 tablespoons of oil over medium-high heat. Fry the eggplants until golden brown. Set aside to cool.
  2. In a large skillet, heat a little oil over medium-high heat. Add the chopped onions and sauté until translucent. Add minced garlic and cook for another minute. Stir in the turmeric.
  3. Add the ground beef and cook until browned. Then add the potatoes, green beans, and chopped tomatoes, one at a time, sautéing each for a few minutes before adding the next. Season with cumin, red pepper, and salt and black pepper to taste. Sauté all the ingredients together. Stir well and add 1/2 cup of water.  Stir everything well, then add 1/2 cup of water. Cover and cook on medium-low heat for 40 minutes, stirring occasionally.
  4. Once the eggplants are cool enough to handle, gently cut them open lengthwise. Sprinkle lightly with salt and gently loosen the flesh with a fork. Generously spoon the mixture into the open eggplant and top with slivered almonds.
  5. In a wide pan, heat 2 tablespoons of oil over medium heat. Add tomato paste and stir well. After a couple of minutes, arrange the tomato slices in single or slightly overlapping layers in the pan. Place the stuffed eggplant over the layered tomatoes. Add a cup of hot water and freshly squeezed lemon juice. Cover and simmer for 15-20 minutes on low heat.
To serve, transfer the stuffed eggplants to a platter. Serve with rice, warm bread, and a side of cool yogurt.

Enjoy!

August 25, 2012

Khorak-e Loobia - Red Kidney Beans Side Dish (Repost)


This is a repost of the recipe I wrote back in 2008 when I was a brand-new food blogger. خوراک لوبیا Khorak-e loobia is a near and dear dish to my heart, not just because it's delicious and healthy, but because it brings back treasured memories of when life seemed so simple and all your troubles could be gone with your mother's encouraging words and warm hugs. I'm not sure how this post never got published correctly. The link to the original post doesn't go anywhere. There seems to be a disconnect between the link and the actual post, and the only way you can see it is by going through the archives of that year. I am not that computer savvy, and I don't know how to fix this problem. Since I didn't want to let this post disappear on my blog, I decided to post it again!


 My mother had a large, fish-shaped glass serving bowl with scale and fin patterns that she would use for serving these cooked beans. I am always on the lookout to find the exact replica of that fish bowl, but haven't found it yet. My mother's recipe called for using a generous amount of olive oil, extra ab-limoo (freshly squeezed lemon juice), and no tomato sauce. However, I added a little tomato paste to this recipe. I like the combination of red kidney beans and the tomato flavor. You can make khorak-e loobia with tomato paste/tomato sauce or even fresh tomatoes, or without it. Also, you can use red vinegar instead of lemon juice. Khorak-e loobia can be made with pinto beans as well.


Khorak-e Loobia - Red Kidney Beans Side Dish

Ingredients
Serves 4-6

-2 cups red kidney or pinto beans
-2 large onions, finely chopped
-4 large cloves of garlic, minced
-3-4 tablespoons olive oil
-2 tablespoons tomato paste
-Juice of 2-3 lemons/limes (use more if you prefer)
-Salt and pepper to taste

Method
  1. Pick over the beans, rinse thoroughly, and soak in water overnight.
  2. Pour the soaking water out, rinse, and place the beans in a large pot. Add six cups of water, bring to a rapid boil over high heat, reduce the heat, and cook for 15 minutes over medium-high heat.
  3. Drain the beans in a colander, then return them to the pot. Add enough water to cover by a couple of inches, cover, and cook over medium heat for an hour. 
  4. In a skillet, saute the chopped onions in olive oil until golden brown.
  5. Add garlic and saute for another 2-3 minutes.
  6. Then add the tomato paste, salt, and pepper, saute for another 1-2 minutes, stir well.
  7. Add a cup of warm water, simmer on low heat for 10-15 minutes.
  8. Pour the content - onion, garlic, and sauce mixture into the pot, stir.
  9. Add lemon juice, taste and adjust the seasoning, cover and simmer for another 20-30 minutes.

Khorak-e loobia can be served warm or cold with warm bread, kotlet, and salad shirazi.

P.S.: I tweaked the recipe just a little bit and added new photos.


Enjoy!

April 24, 2012

Naz Khatoon - Persian Eggplant & Herb Salad with Walnuts & Verjuice - Mazandarani-Style


Naz Khatoon is a simple, fire-roasted eggplant salad featuring freshly chopped aromatic and flavorful herbs, minced garlic, and infused with a verjuice dressing, topped with ground walnuts. I had heard of this dish in the past, and all I knew was that it was a northern Iranian eggplant side dish; I was always intrigued by its name, Naz Khatoon. Naz (subtly coquettish) and Khatoon (lady), literally meaning coquettish lady. However, it wasn't until recently that I began inquiring about it. As the saying goes in Iran, "jooyandeh yabandeh bovad" (one who searches always finds), and I finally found the recipe that I was looking for.


 A few weeks ago, a very kindhearted person that I know, who has been teaching Persian language classes on Saturdays with me a few other dedicated teachers, lent me a booklet on Iranian regional cooking. Luckily, in this thin old booklet, I found the recipe for Naz khatoon with some information about the origin of the dish. Naz Khatoon's recipe is from the town of Behshahr, which is also the capital of Behshahr county in Mazandaran province in the northern region of Iran along the Caspian Sea.


I tried to stay true to the original recipe, but I made a few changes. The original recipe called for the use of local Behshahr basi,l and since that's not available here, I simply substituted the regular basil. The recipe suggests the option of using mint instead of basil. Since both herbs add a burst of flavor and aroma to any dish, I decided to use both, with basil as the main herb and half a bunch of mint and flat-leaf parsley. I love the taste of verjuice, and in my teen,s I remember coming home from school and drinking a glass of verjuice. The recipe called for half a bottle (about 2 cups) of verjuice. This amount may be adjusted to your liking. I used about 1 1/2 cups of verjuice for all the ingredients to be fully infused with it, but it may not be evident in the picture. I only used half the amount of liquid before taking photos for the blog so that the texture of the eggplant, herbs and walnuts would show. The only ingredient that was not included in the recipe but that I chose to add was a touch of olive oil before serving to make it easier on the palate.

Naz Khatoon - Persian Eggplant & Herb Salad with Walnuts & Verjuice - Mazandarani-Style

Ingredients

Serves 4-6

-3 medium-large eggplants, preferably fire-roasted (I roasted them in the oven)
-1 bunch basil, finely chopped, may use a combination of both purple and green basil (I only used green basil)
-1/2 bunch flat-leaf parsley, finely chopped
-1/2 bunch mint, finely chopped
-2 garlic cloves, minced
-1 teaspoon ground golpar (angelica powder)
-1 cup walnuts, ground
-1 tablespoon abghooreh (verjuice), add more if you prefer a more sour flavor
-1-2 tablespoons olive oil (optional)
-Salt to taste

Method:

  1. Pierce the eggplant in several places with a fork. Place over medium-high fire on a stove or a grill until soft. If you are roasting the eggplant in the oven, place the pierced eggplant on a baking sheet and roast in a 400-degree Fahrenheit preheated oven for about 50 minutes or until fully cooked. Remove from the oven or the grill and allow to cool in a colander.
  2. Remove the skin and chop the eggplant finely. 
  3. In a large bowl, combine chopped eggplant, basil, mint, parsley, garlic, and angelica powder. Add salt to taste. 
  4. Pour the verjuice over the eggplant and herb mixture. Mix well. Taste and adjust the seasoning.
  5. Drizzle 1-2 tablespoons of olive oil over the salad.
  6. Sprinkle ground walnuts over the salad.
Serve in a bowl with rice (kateh-style), bread, and yogurt.

Enjoy!

August 20, 2011

Salade Khorfeh - Shirazi Style Purslane Salad


Wouldn't it be nice to walk into your local farmers' market and find bunches of fresh khorfeh (purslane) bundled up and stacked neatly next to the basil and mint on the shelf? I am hopeful that one-day purslane will no longer be considered as just an annoying garden weed that's neglected.  Perhaps if instead of sprouting in every corner purslane was sowed and watered in vegetable gardens then it might have been appreciated more for its nutritional values, beauty and taste. But until then I am grateful that purslane grows everywhere and I can easily spot them on the lawn, in flower beds and next to the garden rocks. I appreciate purslane's generous and humble nature. This year, I have removed some of the purslanes and transplanted them into flower pots to use for cooking. These beautiful and succulent herbs have a distinct sweet and sour taste and are a perfect addition to a cucumber and tomato summer salad.


For this recipe I used small, young leaves of purslane that will go well with tiny pieces of Persian cucumber, firm tomatoes and onion known as salad shirazi.  The combination of these three main ingredients with the lemon juice and olive oil salad dressing is simply a perfect side to many delicious Iranian dishes. If the leaves are broad you may want to chop them into smaller pieces to blend well or just use the tender small leaves. سالاد خرفه Salade khorfeh goes well with khoresh bademjan. A spoonful of aromatic basmati saffron rice mixed with the velvety texture of eggplant sauce and topped with this tasty and crunchy salad is truly amazing!


Last summer, I posted a recipe for mast-o-khorfeh (yogurt with purslane). Tokhm-e khorfeh (purslane seeds) are used as a topping for naan berenji.


Salade Khorfeh - Shirazi Style Purslane Salad

Ingredients:
Serves 4-6

2 cup purslane leaves
5 Persian cucumbers or any small and seedless cucumbers, peeled and cut into small pieces
4 firm plum tomatoes or any small ripe tomatoes, cut into small pieces
1 small onion, (red or yellow), cut into small pieces, I used red onion.
1 teaspoon dried mint 
1/3 cup olive oil or vegetable oil
1/3 cup fresh-squeezed lemon juice
Salt and pepper to taste

Method:
  1. In a large mixing bowl combine purslane, cucumber, tomatoes, onion and dried mint.
  2. Add the lemon juice, olive oil, salt and pepper and mix well. Taste, adjust the seasoning and serve.
Serve this beautiful and delicious salad cold or at room temperature with your favorite dish.

Enjoy!

May 01, 2011

Borani Kangar - Persian Yogurt and Cardoon Dip


A few weeks ago I came across an interesting online copy of an old and rare Iranian cookbook, dating back to the last years of the Qajar dynasty, written in beautiful Persian Nastea'liq handwriting. This cookbook may give us a tiny glimpse into the dynasty that ruled Iran from 1794-1925. Most of the recipes are brief and not easy to follow and some of them seem to be merely a translation of European recipes into Persian. The majority of the recipes basically include the list of the main ingredients with little directions. For those who are interested to see this document please click the following link Women's Worlds in Qajar Iran.


While browsing the book, the recipe for بورانی کنگر borani kangar, also known as mast-o-kangar (yogurt with cardoons), caught my attention. That's when I decided to give it a try but the problem is that I have never seen Iranian kangar anywhere. Kangar looks like a thin celery with thorns and has a very delicate taste and they are in season for a very short time, a few weeks at most. Yogurt and cardoon dip has a distinct flavor and even though it may take some time and effort to prepare cardoons it is definitely worth it.


Luckily, a few days later I was able to find cardoons that are a good substitute for kangar in John's Farm, an Italian vegetable market. However, fresh cardoon has a bitter taste and needs to be soaked or cooked in salted water. Also, in order to prevent cardoons from changing colors during preparation they need to be placed in acidulated water. I found the following link helpful in Preparing Cardoons.


Borani Kangar - Persian Yogurt and Cardoon Dip

Ingredients:
Serves 4

1 bunch cardoons
2 1/2 cups plain yogurt
1-2 garlic cloves, minced *optional
2 tablespoons olive oil
Salt and pepper to taste

Method:

  1. To prepare cardoons remove all leaves and thorns, peel strings with a peeler, cut the stalks into small pieces.
  2. To prevent discoloration place the cardoons in a bowl of water and juice of two large lemons for ten minutes.
  3. In a large pot bring 4 cups of water to a boil on medium heat, add 2 tablespoons of salt and cardoons. Cook for 10 minutes or until tender and drain. 
  4. Chop cardoons finely by hand or use a food processor.
  5. Heat 2 tablespoons olive oil in a pan, add minced garlic and saute for 2 minutes. Then add the chopped cardoons and saute lightly for 5-7 minutes. Add a pinch of salt and pepper. Let cool.
  6. Combine yogurt and cardoon garlic mixture together, taste and adjust the seasoning. 
  7. Place borani in a serving bowl and garnish with dried mint. I also used crushed walnuts and barberries but that's optional. Serve it as an appetizer cold or at room temperature with your favorite dish or any party meals.
*Variation: Combine chopped cardoons with yogurt, mix well and add salt and pepper to taste and skip step #5 in the above recipe.

Enjoy!

April 23, 2011

Torshi Piaz - Pickled Red Onions and Pickled Small White Onions


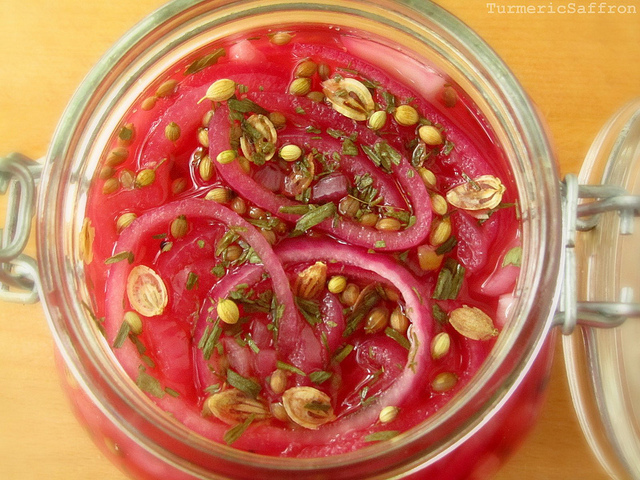
This quick ترشی پیاز torshi-e piaz is easy to make and doesn't require a long aging process before they can be eaten. Torshi is a very popular condiment that is served along with meals at lunch or dinner. There are almost as many different torshi varieties as there are popular vegetables and some pickles are made with more than one kind of vegetable. For example, the Iranian-style vegetable pickle recipe (torshi makhloot) calls for eight different vegetables that are cut into tiny pieces combined with many fresh and/or dried herbs and spices. There is also torshi miveh (fruit torshi), my mother's special recipe that's made with many different fruits and vegetables and is the only torshi that tastes a bit sweet because of the addition of dates and a piece of nabat (rock candy). Torshi is mostly made with vinegar and the taste is rather "torsh" (sour), hence the name. I find pickling very enjoyable and rather calming. Perhaps because it's not an everyday activity like cooking or maybe it's the idea of preservation that's appealing or simply the fact that torshi is delicious and irresistible.


Onions are widely used in Iranian cuisine. Usually, making piaz dagh (fried onions) is the first thing I do when I start to cook any kind of khoresh. Fried onions are also used as a garnish for ash (hearty soups) and some rice dishes. Onions are also served freshly sliced or sectioned with main dishes such as chelo kabab, lamb stew (abgoosht) and most rice and khoresh varieties for lunch. Sauteed, caramelized, pickled, or raw onions absolutely enhance the flavors of most dishes and are essential in cooking.


Thinly sliced, gorgeous pickled red onions and the petite pearly white pickled onions would make a good substitute for the raw onion that many of us grew up with and still enjoy (mostly on weekends).

Pickled Red Onions

Ingredients:

1 1/2 pounds medium red onions, peeled, thinly sliced
3-4 cups white distilled vinegar
2 tablespoons dried tarragon (tarkhoon)
1 tablespoon dried savory (marzeh)
1 tablespoon coriander seeds (tokhm-e geshniz)
1 tablespoon crushed angelica (golpar)
1 tablespoon nigella seeds (siah daneh) *optional
1 red hot dried pepper
3 tablespoons salt

Method:
  1. In a small bowl combine dried tarragon, savory, coriander seeds, crushed angelica and nigella seeds. 
  2. Pour vinegar in a non-reactive pot, place on the stove and bring to a gentle simmer on medium-low heat.
  3. Stir in the spice mix, add the red pepper and let it gently simmer for about five minutes.
  4. Place the sliced onions in the pot with vinegar and spices, add salt, gently stir with a wooden spoon, simmer for another 5-7 minutes.
  5. Remove from heat and let vinegar cool to room temperature.
  6. Pour the onions and vinegar into a clean and dry glass jar with a tight-fitting lid. Make sure all ingredients are covered by vinegar. Add more vinegar if needed. Close the lid tightly.
  7. Store in a dry and cool place.
  8. This pickle is ready in 2-3 days.
***

Pickled Small White Onions

For pickled white onions, you may use the same spices listed in the above recipe and a pinch of turmeric for a tastier torshi. However, if you would like the onions to maintain their color, here's a simpler recipe with only a few ingredients.


Pickled Small White Onions

Ingredients:

1 pound small white onions, trim both ends of onions and peel
3-4 cups white distilled vinegar
3 tablespoons salt
1 red hot dried pepper
1 whole fresh tarragon (with leaves attached to stem), washed and placed on a paper towel to completely dry

Method:

  1. Bring vinegar to a gentle simmer in a medium non-reactive pot on medium-low heat.
  2. Place the onions and the red pepper into the pot, add salt and stir. Simmer for 5-7 minutes.
  3. Remove from heat and let cool completely.
  4. Transfer the onions and vinegar into a clean glass jar.  Place the whole tarragon and the pepper in the center of the jar, for easy removal later on. Add more vinegar if needed.
  5. Close lid tightly. Keep in a cool and dry place.
  6. This pickle is ready in 2-3 days.
Enjoy!